Click Add Automation .
.
The Add Automation pop-up window appears.
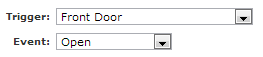
Select a trigger for this automation from the Trigger drop-down list.
The list of triggers available depends on which devices are installed at your site.
Select an event from the Event drop-down list.
The events listed are directly related to the selected trigger, so there are no options on this list until you select a trigger.
From the Active drop-down list, select the conditions under which you want the automation action to occur.
- If you select Always, the automation action occurs at all times and in all modes when the trigger event occurs.
-
If you select During Selected Times/Days, you can specify the times and days when the automation action is to occur (by default all days are selected). If you deselect a day, this automation action does not occur on that day, even if the specified trigger event occurs on that day.
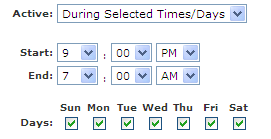
If you want the automation action to occur any time the trigger event occurs, leave the default selection Always.
-
If you select In Selected Modes
, you can specify in which security system states and modes the automation action is to occur (by default all states and all modes are selected). If you deselect a state or mode, this automation action does not occur while that state or mode is active, even if the specified trigger event occurs while that state or mode is active. It is important to note that automations will only be active when the system is in one of the selected security system states and in one of the selected modes at a given time. For more information about modes, see "About Modes".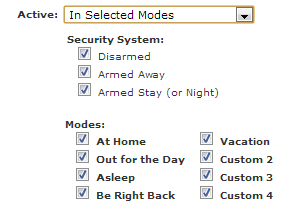
If you want the automation action to occur in all modes, leave the default selection Always.
Click Add Actions.
The Add Automation pop-up window appears.
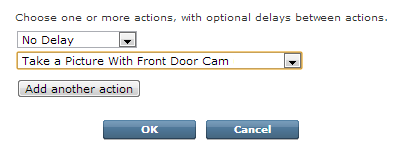
From the action drop-down list, select the action you want to take place when the trigger occurs.
If the action involves taking a picture or capturing a video clip, the resulting picture or video clip appears in the Cameras section of the Summary tab.
If you want to add multiple actions, click Add another action, and then choose the action's delay and action options.
For each additional action, the delay refers to the amount of time between the end of the previous action and the start of this action. If you want a set of actions to occur in a particular order with delays between the actions, you need to add the actions in that order.
Click Save.
You return to the Automations tab with the new automation added to the list.